Friday, June 1, 2012

Tips For Recording A Violin

Recording Your First Violin

?

On The Home Recording Forum, Kyle Knapp asked about recording a violin for the first time. So, here are a few tips for recording a violin or any other instrument you have never recorded before.
Check out the forum thread: Violin Micing Techniques

Instruments like this (violin, flute, etc) require a natural sound. This is good. When you have to concoct fake stuff (like certain rock drums) you run into trouble. You can't screw this up.

#1 The Room - Take your time and walk around with your violin player and see if there is a place that sounds more pleasing than others. I'm not saying that the bathroom is necessarily right for the song (but it might be). Walking around the room is a big deal to getting a great sound. There will be sweat spots within a room. When in doubt, I'd go with a room with less liveliness. When a really live room is right for a song, you won't have any doubts. Don't be afraid to slap some blankets on a mic stand and move them around to knock down a bad reflection, if necessary.

#2 Avoid harshness - I'd start with the KEL and go from there. If the violin hurts, you failed. End of story. Record the violin a little while. Then, solo it and crank up your monitors. If you feel screeching pain, you need to do something different. (Use a darker mic or a darker sounding mic placement).

#3 Natural sounds seldom come from DIs ("unnatural" isn't necessarily a bad thing). Generally speaking, a mic 2' from the source almost always sounds natural. You can't really lose with this mic placement as long as the room doesn't suck and you aren't picking up too much harshness.

#4 Keep your ears open. When recording a new instrument, you really learn how to engineer. Engineering is about listening and reacting for the song. Throw out methods you may read online (especially anything I tell you..ha ha). Forget about X method being the "right" method. That's bologna anyway. Instead be willing to try stuff if something isn't working.

#5 There is no conventional way of doing this because you've never done it before. So, be willing to put the mic in a really stupid place if it sounds best. Your monitors are your friends now. No one is going to be looking at pictures of your violin mic placement. They will be hearing your album forever (hopefully). I once recorded an acoustic guitar with the mic about 2” from the floor. No one ever complained or even knew about it. (I put up a mic in the conventional spot so the guitar player wouldn't notice).

#6 Keep it simple. If you have never recorded an instrument before, try sticking with a single mic. There is no benefit to crazy stereo (or worse) setups when you are just learning to record a new instrument. Going to tape / disc with a single mic ensures that you like what you are getting. One perfectly placed microphone is 1,000 times better than two mics placed in so-so spots.

#7 Remember that you are capturing a musical performance. Make sure the violin player is giving you what you want. If they have any skill at all (most violin players can do anything you need if they are worth recording at all) than don't settle for less. A big part of the engineering is the producing. If you need a screaming violin, make sure they know that. If you want a smoother, prettier sounding violin make sure they know that.

Thursday, May 31, 2012

Sexy violin.

sexy_violin_640_01

Cách lựa chọn 1 cây đàn Violin tốt

20676336_images1263794_violin

Violin được mọi người ca tụng là Nữ Hoàng trong các loại nhạc cụ. Có lẽ chính vì lý do đó mà để lựa chọn được một Nữ Hoàng cho đam mê của bản thân, sẽ gây đôi chút khó khăn cho những ai đã trót mê loại nhạc cụ Quý Tộc này. Bài viết sau đây hi vọng sẽ giúp các bạn tự tin hơn sau khi đã quyết phải Cưới 1 em Violin về làm Vợ :))

1 - Về cây đàn
Khi mua violin bạn nhìn lên cái top của cung đàn (chỗ máy cái cần để chỉnh dây đàn đó , xem thử cái miếng mà để tựa những dây đàn có thấp quá không , nếu thấp quá là không được >> âm phát ra sẽ không trong , bấm lại không ấm
2- Về tăng đưa
Cái này nằm ở gầm chỗ tựa cằm
Phải kiểm tra đủ phải có 4 cái tăng đưa
Tăng đưa : là cái trục nhỏ để vặn và chỉnh cho dây đàn chính xác tuyệt đối ngoài cái cần chỉnh đàn ở top
3- Ngoài ra khi mua đàn phải mua đủ bộ
- 1 asshe ( cây bow )
- 1 gối tựa ( dùng để kẹp với violin )
- 1 hộp nhựa thông ( dùng với asshe )
- 1 bộ dây đàn sơ cua
- Và tất nhiên cuối cùng là cây Violin của bạn :)

Saturday, May 19, 2012

Các điều lưu ý và kĩ thuật khi học violin.

article-new_ehow_images_a07_qo_nf_proper-violin-bowing-techniques-800x800

1) Luyện tập mỗi ngày thì tốt hơn là dồn hết thời gian vào chỉ một ngày trong tuần.
2) Chỉ tập trung luyện kéo những đoạn khó trong bài cho đến khi thuần thục thì tốt hơn là kéo đi kéo lại nguyên bài để hoàn thiện bài đó.
3) Diễn thử cho người thân và bạn bè trước khi bạn biểu diễn trước người khác.
4) Đặt ra mục tiêu và kế hoạch cho mình trong mỗi giai đoạn luyện tập. Cần kiểm tra lại thường xuyên.
5) Tìm kiếm chinrest cho phù hợp.
6) Luyện tập thang âm và hợp âm rải (cả 3 bát độ) hằng ngày cho đến thuần thục. Thay đổi đa dạng nhiều sắc thái. Bạn sẽ rút ra được rất nhiều bài học về kĩ thuật kéo cung trong hình thức luyện tập này.
7) Kĩ thuật kéo và điều khiển cung tốt chính là chìa khóa quan trọng để bạn trở nên một violinist giỏi hơn, bởi vì hầu hết màu sắc của âm thanh đều liên quan đến cách kéo cung.
8) Chùi sạch nhựa thông sau mỗi lần tập xong nếu không để lâu ngày nhựa thông sẽ khó xóa.
9) Giấc ngủ là tối cần thiết cho bộ não để nó ôn lại những gì bạn đã tập luyện.
10) Tập luyện những bài etude của Mazas, Kreutzer, Rode, Fiorillo, Gavinies, Dont v.v..
11) Xả lông đuôi ngựa của cung kéo chùng xuống mỗi khi tập luyện xong.
12) Xem xét thật chi tiết bản nhạc bạn đang luyện tập, nếu có nhạc cụ đệm kèm, bạn nên nghe và nhớ được phần đó.
13) Khi chơi violin tâm lý phải hứng khởi, nếu không thì ... khó đấy.
14) Bạn nên tạm ngừng tập khi cảm thấy không có âm thanh nào nghe được ổn như mọi khi. Sau một hoặc vài ngày bạn hãy quay trở lại với chiếc đàn yêu quí.
15) Luôn thủ sẵn một vài bài mà bạn có thể kéo liền ngay lập tức, ngay cả khi không có nhạc cụ đệm kèm.
16) Tương tự, khi bạn mắc lỗi liên tục và cảm thấy bị đuối hay mắc kẹt, bạn hãy dừng lại và nghỉ ngơi.
17) Phải thoải mái và tập trung trước khi bắt đầu tập luyện, nếu chưa được thì tạm ngừng cho đến khi bạn cảm thấy đã sẵn sàng.
18) Bạn nên nghe những violinist kì cựu chơi bản nhạc mà bạn đang luyện tập thật nhiều lần để làm tiền đề cho việc hoàn thiện nó.
19) Thay dây và rehair bow định kì.
20) Mọi người thường có khuynh hương tập trung nhiều vào phần đầu và khá sơ sài ở phần cuối, để thay đổi điều này, thi thoảng bạn dành 1-2 ngày để "xọc" thẳng vào những phần khác của bản nhạc.

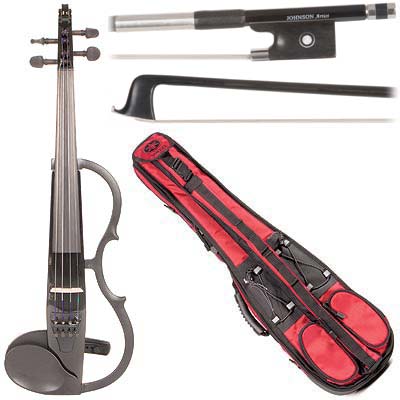
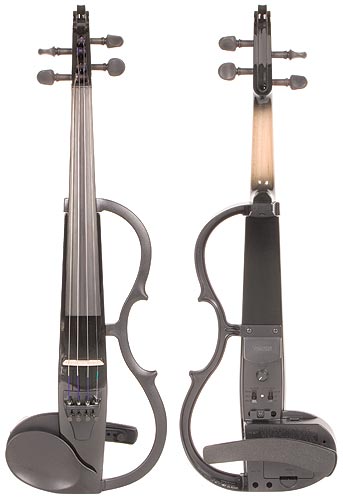
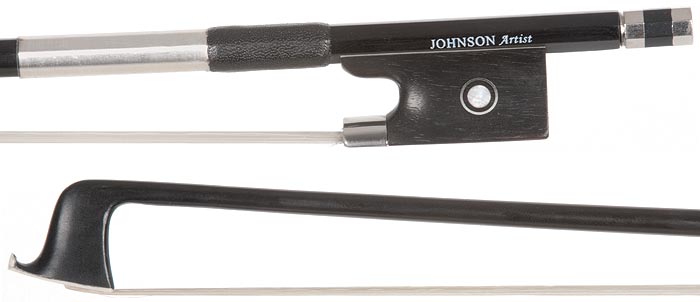
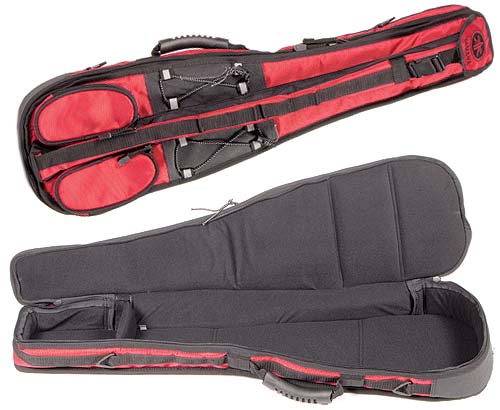
Yamaha SV-130 Concert Select Silent Electric Black 4/4 Violin Outfit including a Johnson Artist Carbon Composite 4/4 Violin Bow & Yamaha Red Gig Bag

This incredible instrument outfit includes the highly acclaimed Yamaha SV-130 Concert Select Silent Electric Black 4/4 Violin, a Johnson Artist Carbon Composite 4/4 Violin Bow, and a Yamaha Red Violin Gig Bag.

The Yamaha SV-130 Concert Select Silent Electric Black 4/4 Violin provides violinists of all levels with the ability to practice confidently without disturbing others. Though the acoustic sound produced is barely a whisper, you will hear yourself in the rich, virtual environment of a resonant concert hall. The SV-130 allows players of any level to play or practice anytime. This beautiful violin enables players of all levels to practice silently, anyplace and at anytime. With the inclusion of a 1/4 inch output jack, this instrument can be played through any standard amplifier, and the violin's improved circuitry produces higher quality sound while reducing noise output. The SV-130 may also be used along with an MP3 or CD player through the aux-in jack, useful for practice or just to play along with your favorite tunes. This beautiful silent violin screams Yamaha quality!

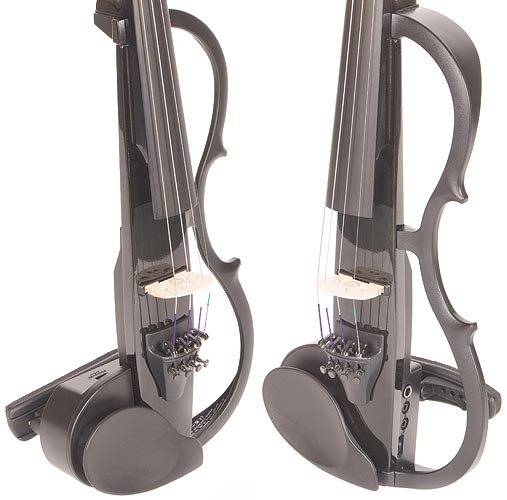
The SV-130 Silent Electric Black 4/4 Violin is simply one of the most versatile violins ever made - extremely playable and there is no need to alter your technique to play them. This full size black 4/4 violin is easy to hold and play, offering the natural feel and resonance of an acoustic violin. This is a highly capable performance and practice instrument!

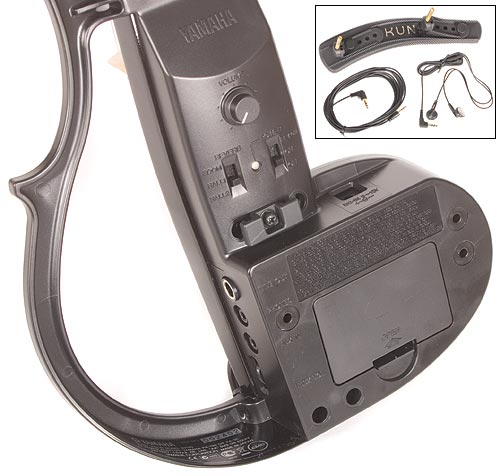
The SV-130 features: Spruce Body - Maple Neck - Ebony Fingerboard - Ebony Pegs - Maple Aubert Bridge - Molded Plastic Side Body, Tailpiece, and Chinrest - 4 Fine Tuners - Steel Core Kessler Strings - Unique Kun Shoulder Rest Made Specifically For The SV-130 - Master Volume - Reverb Type Select - Aux-In Volume - In/out Jacks - Headphone Out - Line Out - Aux-In -Piezo Sensor
Built-in electronics allow the player to plug in standard headphones and play privately without disturbing neighbors, or to plug into a standard amplifier for stage performance. Play a standard CD or MP3 with the violin plugging in the provided cord, and then practice with the music. The volume level of the violin and CD can be adjusted for perfect balance. With the inclusion of a 1/4 inch output jack, this instrument can be played through any standard amplifier, and the violin's improved circuitry produces higher quality sound while reducing noise output. Operates on two AA batteries or optional AC power adapter.

The Johnson Artist Carbon Composite Violin Bow has a sleek, black stick of high quality carbon composite material, and is strung with high quality horse hair. The bow is strong and flexible, handles well and provides rich, clear tone. The ebony frog is mounted with nickel and is decorated with a Parisian eye. The grip has silver winding and a thumb leather. The button is double-banded with ebony and nickel. It weighs approximately 60.5 grams. Perfect for electric violins!

Yamaha's Red Gig Bag features the "Tri-carry" design letting you use the handle, or the strap for over-the-shoulder or backpack-style carrying. Multiple storage areas for a bow and other small accessories. Rip chord fasteners on the exterior provide additional storage options. This is a high-quality gig bag made specifically for the SV Series.
High-quality Red Nylon with Black Trim
Tri-carry design: Use the handle or the strap  over your shoulder or like a backpack.
Compartments: Multiple storage areas for a bow and other small accessories.
Rip-chord fasteners: Exterior fasteners for additional storage.

Thursday, May 17, 2012

Glass violin.

draft_lens5645712module43688102photo_1246506924Untitled-1

Girl with violin.

577920_409041139120578_408951295796229_1475568_494386701_n 389690_409043729120319_408951295796229_1475574_733901690_n

How to String a Violin

Strings age and wear out whether they're metal or gut. Preventive medicine is the prescription. Do a "transplant" before they give out during a performance.
Steps:
1. Loosen all four strings gradually. Remove each string from the hole in the doweling that penetrates the scroll.
2. Retrieve the bridge that supported the strings. Place it in the violin case for later use.
3. Cut the violin strings from the "tail-piece" keyholes. Mark these holes to remember which string is mounted where.
4. Tie a small knot at the base end of each string to fit below the string slot, forming an anchor point when tension is applied.
5. Thread the clean end of each new string through the underside of the hole slots in the tailpiece. Be sure the string is securely set and will not slip when tension is increased.
6. Thread the opposite end of each violin string through the holes in the proper doweling rod so that additional turns will lie on top of the end of that string and prevent it from slipping. Tension is not to be applied yet.
7. Set the strings on top of the bridge indentations with the bridge foot over the tone post.
8. Gradually tighten the strings; tighten them all in rotation, a little at a time.
9. Use a four-note pitch pipe or a piano to begin the pitch matching and the tuning process.
10. Be aware that the tuning will gradually "flatten" due to the normal stretching of new strings. Stretching should be complete in one week.
Tips:
Check the condition of the bridge. If damaged or cracked, replace it with a new one.
Warnings:
Avoid the total mounting or removal of one string at a time. Tension problems can cause a potential "warp" in the instrument.
Mark the exact point where the bridge was mounted so replacement is exact. There is a supporting "tone post" underneath the base of this mount point that transmits the string vibrations to the entire instrument. This tone post location can be seen by peeking through the "f" holes in the top of the instrument.
Tips from eHow Users:
String Replacement by Ellie Mae H.
Before re-tightening strings, a soft lead pencil should be applied to all four grooves at both the nut and the bridge. This acts as a lubricant to prevent early string breakage and future bridge warping.
One at a time:
You should never remove all four strings from a violin. Always change one string at a time, checking the bridge placement and angle carefully between each string change. Also, there is no reason to cut the strings. Violin strings are made to be easily inserted and removed from the tailpiece.

Followers